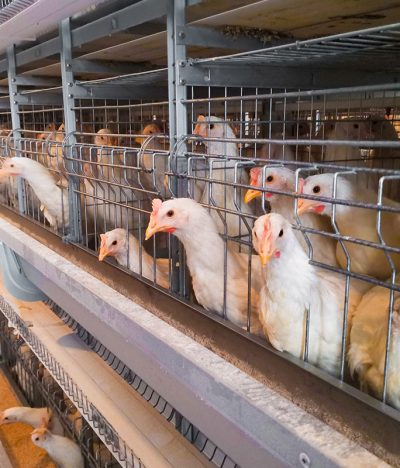
Complete Guide to Core Data of Broiler Cage Equipment
As broiler cage farming becomes increasingly widespread and shed design matures, the success rate of breeding is rising year by year. However, many practitioners still find it difficult to grasp key data such as equipment selection, ventilation calculation, and stocking density for caged broiler houses—after all, each item involves complex calculations, and even a slight deviation may affect the growth performance of the entire batch of chickens.
I. Ventilation Equipment: Exhaust Fans, Water Curtains, Air Intake Windows, and Ventilation Ducts
Ventilation is the lifeblood of successful broiler chicken farming. Equipment configuration directly determines the air velocity, temperature uniformity, and air quality within the coop.
1. How to Calculate the Number of Exhaust Fans?
The core objective is to achieve a maximum average wind speed of 2.8 m/s (recommended value for caged chicken coops).
Formula: Number of Exhaust Fans = Cross-sectional area of the chicken coop (㎡) × 2.8 ÷ 10
Example: A chicken coop with a cross-sectional area of 54㎡ → 54 × 2.8 ÷ 10 = 15.12, rounded up, meaning 16 large exhaust fans are needed.
Note: Cross-sectional area = chicken coop width × side wall height (eave height + average roof height). Actual measurement is more accurate.
2. Water Curtain Area Matching Principle
Rule of thumb: 1 large exhaust fan corresponds to 7㎡ of water curtain.
Taking the aforementioned 16 exhaust fans as an example, the total area of the water curtain = 16 × 7 = 112㎡. These can be distributed and installed on the gable walls or side walls to ensure a reasonable airflow velocity (1.5~2.0 m/s).
3. Number of Air Inlet Windows and Ventilation Pipes
The total area of the air inlet windows must meet the air intake requirements when at least 40% of the exhaust fans are running simultaneously. A simplified calculation: 1 small window + 1 ventilation pipe (200mm diameter) for every 200 chickens.
For example, a chicken house with 30,000 chickens → 30,000 ÷ 200 = 150 windows, meaning 75 windows and 75 ventilation pipes on each side wall.
If the chicken house is wide or the climate is extreme, the number of windows can be increased appropriately, and static pressure control can be used to ensure uniform minimum ventilation in winter.
II. Cage Selection: How to Determine Width, Height, and Number of Layers?
The market offers a wide variety of cages. Ingot cages are affordable but somewhat poorly made, while frame cages offer higher precision but are more expensive. In practice, the differences in breeding performance between the two are not significant, so choose according to your budget.
Key Specifications Recommendations:
Single Row Width: 60-140cm is common. I personally do not recommend cages exceeding 1 meter (100cm), otherwise ventilation in the middle area will be poor and feeding will be uneven.
Cage Height: Not less than 45cm (50-60cm recommended). Too low a height will affect airflow, temperature stratification, and water level regulation.
Number of Layers: 4 layers significantly increase the difficulty of management, creating a sharp conflict between ventilation and humidity. Not recommended for beginners; 3 layers or less are more stable.
III. Stocking Density: Adjust Flexibly According to Target Weight and Season
Density is inversely proportional to slaughter weight, and feeding space and manure management in the later stages must be considered.
Taking a target slaughter weight of 2.75kg (5.5 jin) as an example:
Baseline density: 17.5 birds/㎡ ± 1 bird (corresponding to 48kg/㎡ ± 2.75kg live weight)
Winter/Cold Season: Can be increased to 18.5 birds/㎡ (high insulation costs, appropriate dense stocking)
Summer/High Temperature and Humidity Areas: It is recommended to reduce to 16.5 birds/㎡ or lower to reduce heat stress.
Density adjustments should also be combined with local slaughter age, feed nutrition, and management level; do not blindly copy.
IV. Feed and Water Levels: Ensure Each Chicken Has Enough to Eat and Drink
Feed Calculation (Taking a 5.5-pound slaughter weight as an example)
Minimum Feed Level: ≥ 8 cm/chicken
If the cage is wide, be sure to install feed troughs on both sides; otherwise, insufficient feed will limit later weight gain.
For example, a single feed trough on one side may not be enough for a 60cm wide cage. It is recommended to equip each cage with two feed troughs or use an extended feed trough.
Number of Nipple Drinkers
Theoretical Water Supply: 1 nipple can serve 8-10 chickens, but it is recommended to err on the side of more rather than less.
Actual Configuration:
Cage length 60-80cm → Install 2 nipples
Cage length 80-100cm → Install 3 or more nipples
Ensure nipple flow rate ≥ 70ml/min, and adjust the height according to the age of the chickens.
V. Final Reminder: Data is the Skeleton, Fine-Tuning is the Soul
The above algorithms are based on generally accepted industry experience and can help you quickly select equipment. However, the aspect ratio of the chicken coop, local extreme summer temperatures, and minimum winter ventilation requirements will all affect the final parameters. Recommendations: Verify the actual performance of exhaust fans on-site using an anemometer and negative pressure gauge; Configure the water curtain area with 1.2~1.5 times redundancy to cope with extreme heat; Optimize the layout of ventilation ducts and small windows based on smoke tests.
Successful cage-raised broiler chickens = scientific data + meticulous management. Mastering this set of basic algorithms will allow you to avoid 80% of the initial design pitfalls.